
This is a project that the students seem to go crazy for.
Beware, it's also the messiest. The technique of
Papier-mâché has been around for a very long time. Although the process seemed very intimidating for me at first, there are only a few components needed to get an awesome result. Once you get the hang of it, it's very simple and fun!
I shared my love of
Pablo Picasso with the students today.
Pablo Diego José Francisco de Paula Juan Nepomuceno María de los Remedios Cipriano de la Santísima Trinidad Martyr Patricio Clito Ruíz y Picasso was a child prodigy and he could paint pain-stakingly beautiful portraits and charcoal drawings as a young child. His father was an art teacher, so he was exposed to art at a very early age. I think this is what freed Picasso to go further in his art, to explore different ideas and techniques.
When you can draw and paint like a master at the age of eight years old, what else is there to do? Murals, abstract art, bronze sculpture, found object sculpture, Cubism, African-inspired art, etc. And this is exactly what he explored during his 92 years of life.
- Supplies you will need to mix Papier-mâché: inexpensive bottle of liquid starch, water, newspaper, cardboard pieces, masking tape, scissors, egg crate pieces, old paint trays.
- Mix liquid starch and water in a 50/50 ratio. Pour into old paint trays.
- Encourage students to rip newspaper into strips.
- Explain to students how they can build their sculptures by using cut cardboard pieces and egg crates pieces. They sculpture can be secured with masking tape. This will all be secured with the Papier-mâché mix.
- Once they've built their sculpture, they can start the Papier-mâché process.
- Dip a newspaper strip into liquid starch mix. Make sure you squeegee off excess liquid. Start laying wet strips onto your sculpture in a smooth, flat fashion.
- Keep laying down the wet newspaper strips until the entire sculpture is covered. Working around noses and eyes can be a little tricky, but teach your students how they can form their sculpture with their hands by shaping the wet newspaper.
- This project is usually done over a two class sessions. During the first session, the sculpture/Papier-mâché phase has to be completed.
- Since I can't store my supplies in the classroom, this means I have to take some 20-something partially wet masks. Yay me.
- When I have them at home and they are completely dry, I paint a layer of white primer on top. This will create a uniform surface for the students to paint designs on. It will also keep their paint true to the original color so they won't have to use several coats of paint. If you are in class, you can have your students primer their own masks.
- During our next class session, we paint, glue feathers, beads, raffia, twigs and whatever else the students want on their masks. It's amazing how different they all come out.
- Students painted with Craft Smart paint instead of tempera paint because there are so many more vibrant colors to choose from. You can find it at any Michael's Art & Craft for .99 a bottle.
- Once they are all completed, have students lay out their masks so the class can look at each work of art. My students always love this part of class!
 A dragon created by a fifth grader.
 An African-inspired mask created by a high school student.
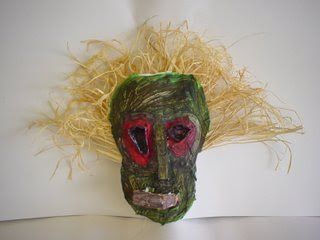
This mask was created by son, who was in the first grade at the time. I helped with the raffia.
The Cubism-inspired mask at top left was created by a junior in high school. It's my favorite.


