Showing posts with label Smart Craft paint. Show all posts

3-D Papier Mache Sculptures

Hello, fellow lovers of modern art. Long time no see.

Where have you been?  
Me? Where have I been?

Touché.

I've been around, brewing up some crazy art projects. Hopefully, I'll get to share them with you soon! A while ago, I posted this really cool Claes Oldenburg project we did creating papier mache sculptures of letters in the alphabet. Here are a few of the images from the project.

My far, this was the most time consuming aspect of this project. Constructing the letters out of cardboard, styrofoam cups, paper and tape. Making sure everyone's letter was just so. It was fun but you need several hands for this if your students are in the younger grade bracket.


The start of the papier mache process. It usually starts off so nice and civilized.


My husband and son, trying to show the students the proper way to apply their papier mache strips onto their sculpted letters so they don't end up with a starchy mess.
I love the fact that every time I introduce a new project, I hold my breath for any glitches. I've had plenty of moments where the tape didn't stick right, a print didn't even come out, or the you could barely see the paint or the students finished their piece in under fifteen minutes. LOL Even though I make samples and try techniques out at home, stuff happens.  In this case, I was really hoping the cardboard base would stand up to the papier mache liquid, especially with the students and their overzealous papier mache techniques, slopping it on and whatnot.
A little soggy, but nothing a few hours in the sun couldn't dry out.
All of the letters turned out so cool!
Some could even used as weapons. :)
Once they were dry, I thought it would be easier if I took them all home and painted a coat of primer on them myself. Until it was almost midnight and my hands were covered with white primer and I still had a huge pile to finish. Why do I always get myself into this mess? Story of my life!

So creative and so fun! And the hard work is always worth it in the end.
If you want a step-by-step instructions on how to complete this project, you can check out my Pablo Picasso papier mache project for papier mache basics. Or, you can go to Art Projects For Kids for another 3-D Papier Mache Letter. Have fun!

Claes Oldenburg: Large Papier Mache Sculpture


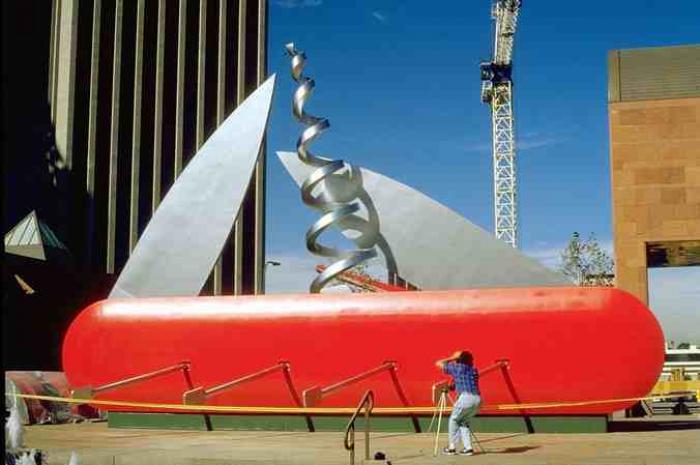
Claes Oldenburg is the perfect artist to share with children. Who wouldn't love his giant ice cream cone leaning precariously over the edge of a building? Or his monumental swiss army knife? And what about his huge floor cake made out of soft fabrics?

My students loved it all! Drawing inspiration from Mr. Oldenburg himself, as well as a lesson from Art Projects for Kids, respectively, I thought we would create our own giant letters from papier mache. It was most definitely an ambitious project, especially when your class is only one hour long and you don't have a sink in your classroom.

But anyhoo, we overcame our obstacles and completed this papier mache project in four class sessions. The classroom was loud, a little chaotic and messy. This is definitely the day when you will need to find several mom helpers to assist you because you will need as many hands as an octopus to ensure you finish each step when you should.

Since you can easily find step by step instructions for papier mache here and here, I won't reinvent the wheel but I will share how I broke down this project into manageable stages.

  • Collect as much cardboard, newspaper, computer paper and masking tape as you can haul with you.
  • Day #1: This class should be dedicated to drawing, tracing and cutting out your letter from cardboard using scissors. Use your letter as a stencil and create a second letter. Cut it out. We decided to go with a bigger sized letter (around 11 X14 inches) so it could stand up to the papier mache process.
  • Start constructing letters using styrofoam cups and masking tape. Wrap in computer paper and tape it with masking tape in preparation for papier mache.
  • Day #2: Time to papier mache. Make sure your student takes special care to get into all the bends and folds of their letter. It will look neater in the end.
  • Let dry.
  • Day #3: Paint one coat of white primer paint or spray paint them with a white primer color.
  • Let dry.
  • Begin to add color by painting your letter. Base colors first, to ensure even coverage. Smart Craft paint is inexpensive craft paint that comes in a huge variety of colors. And it costs .99 cents, so what is there not to love?
  • Day #4: Finish painting fully constructed letter with acrylic paint.
  • You can use an old hairdryer to speed the drying process. Once its dry to the touch, you can add patterns, multiple colors, you can design on it with markers, or in the case of my art student, you can splash paint all over it.
The sculpture above was created by a fourth grader.

Frank Stella: Relief Sculptures


Frank Stella is an American Minimalist painter and sculptor whose work spans over five decades! He's one of the first artists to use shaped canvases. I really like Stella's bold use of line and shape. All those clean lines and graphic shapes make me happy. He really charms this slightly obsessive compulsive artist's little heart! I've been stewing over a Frank Stella project for a couple of years now, not really knowing how I would flesh it out. After getting a few ideas online and gathering it with some of the classroom experience I have acquired, this project was really fun and manageable for the students. And me! I decided to explore Stella's relief sculptures. This translated nicely with simple cardboard shapes, paint and a hot glue gun.

  • A few weeks before class, gather a bunch of cardboard scraps. Perhaps you have some left over from your papier mache project. I used cereal and pasta boxes too and they seemed to be alot easier for the students to cut with scissors.
  • You will also need paint. My students didn't like the way tempera paint was flat, so we used some Smart Craft and Tulip paint instead. It was much more bright and vibrant.
  • I began by showing the students some of Stella's sculptures, for inspiration.
  • To get the students going, I had them sketch some simple shapes onto newsprint, which they then sketched onto the cardboard.
  • I will admit the classroom was a bit chaotic, since there were students in different phases of the project. I had three tables going: one for cutting the cardboard, the second for painting and drying (with my handy dandy hair-dryer!), and the third for assembling/gluing sculpture together.
  • I helped each student with their concept. Some students were inspired by music, sports and aliens.
  • It is important for each student to create a base for their sculpture, so they have something to build their shapes upon.
  • After each cardboard piece is cut out, begin the painting phase. Since there was no time to primer them, each piece needed a couple of coats of paint. Here is where the hair-dryer comes in.
  • Encourage students to create designs and patterns on their cardboard pieces, which will make the overall sculpture more intricate and eye-catching.
  • When all pieces are dry, instruct students to play with their shapes, arranging them in the most visually interesting design. This was fun!
  • Now the trick is to remember how you originally laid it out so you can recreate it while laying it down with a hot glue gun!
  • I didn't feel comfortable with the students handling a hot glue gun, so I just sat down with them and had them instruct me where each piece went so I could glue them down. You could also use basic Elmer's glue but it would probably take a long time to dry and wouldn't be as sturdy. Of course, older students can use a hot glue gun.
I was really impressed with how they all turned out. The students were really involved with each process and once again, I am amazed at their creativity! So give this project a try, it was alot of fun and there are lots of ways you can adapt the overall concept.

The artwork above was created by my son, who is in the 3rd grade. Here are a few additional sculptures made by my students.


Pablo Picasso Masks: Papier-mâché

This is a project that the students seem to go crazy for. Beware, it's also the messiest. The technique of Papier-mâché has been around for a very long time. Although the process seemed very intimidating for me at first, there are only a few components needed to get an awesome result. Once you get the hang of it, it's very simple and fun!

I shared my love of Pablo Picasso with the students today. Pablo Diego José Francisco de Paula Juan Nepomuceno María de los Remedios Cipriano de la Santísima Trinidad Martyr Patricio Clito Ruíz y Picasso was a child prodigy and he could paint pain-stakingly beautiful portraits and charcoal drawings as a young child. His father was an art teacher, so he was exposed to art at a very early age. I think this is what freed Picasso to go further in his art, to explore different ideas and techniques. When you can draw and paint like a master at the age of eight years old, what else is there to do? Murals, abstract art, bronze sculpture, found object sculpture, Cubism, African-inspired art, etc. And this is exactly what he explored during his 92 years of life.
  • Supplies you will need to mix Papier-mâché: inexpensive bottle of liquid starch, water, newspaper, cardboard pieces, masking tape, scissors, egg crate pieces, old paint trays.
  • Mix liquid starch and water in a 50/50 ratio. Pour into old paint trays.
  • Encourage students to rip newspaper into strips.
  • Explain to students how they can build their sculptures by using cut cardboard pieces and egg crates pieces. They sculpture can be secured with masking tape. This will all be secured with the Papier-mâché mix.
  • Once they've built their sculpture, they can start the Papier-mâché process.
  • Dip a newspaper strip into liquid starch mix. Make sure you squeegee off excess liquid. Start laying wet strips onto your sculpture in a smooth, flat fashion.
  • Keep laying down the wet newspaper strips until the entire sculpture is covered. Working around noses and eyes can be a little tricky, but teach your students how they can form their sculpture with their hands by shaping the wet newspaper.
  • This project is usually done over a two class sessions. During the first session, the sculpture/Papier-mâché phase has to be completed.
  • Since I can't store my supplies in the classroom, this means I have to take some 20-something partially wet masks. Yay me.
  • When I have them at home and they are completely dry, I paint a layer of white primer on top. This will create a uniform surface for the students to paint designs on. It will also keep their paint true to the original color so they won't have to use several coats of paint. If you are in class, you can have your students primer their own masks.
  • During our next class session, we paint, glue feathers, beads, raffia, twigs and whatever else the students want on their masks. It's amazing how different they all come out.
  • Students painted with Craft Smart paint instead of tempera paint because there are so many more vibrant colors to choose from. You can find it at any Michael's Art & Craft for .99 a bottle.
  • Once they are all completed, have students lay out their masks so the class can look at each work of art. My students always love this part of class!
A dragon created by a fifth grader.


An African-inspired mask created by a high school student.
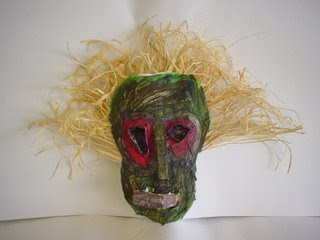

This mask was created by son, who was in the first grade at the time. I helped with the raffia.

The Cubism-inspired mask at top left was created by a junior in high school. It's my favorite.